October 11, 2015

How Do I... Adhesive Schmadhesive...

Did you ever pack a small tool kit for your favorite scrapbooking class, only to discover you brought the wrong kind of adhesive?  Ever buy a nice looking “all purpose” glue only to find that it didn’t really fit all of your purposes?  Ever picked a cool embellishment out of your stash and wondered how in the world you were going to make that stick?


One of the most common questions we get in the store is, “Which adhesive do I need for this?”  It can be a little intimidating staring at an 8 foot long display of tapes, liquid glue, glue tabs, glue dots, pop dots… and the list goes on.  Do you really need all of those different things?  The answer is yes and no.  You don’t need one of every type of adhesive you’ve ever seen, but unless you have very little variety in your work, you are going to need a few different types of adhesive to meet all your paper crafting needs.  We thought it might be useful to show you a basic scrapbooking layout and discuss a few adhesives that we believe every paper artist will need.


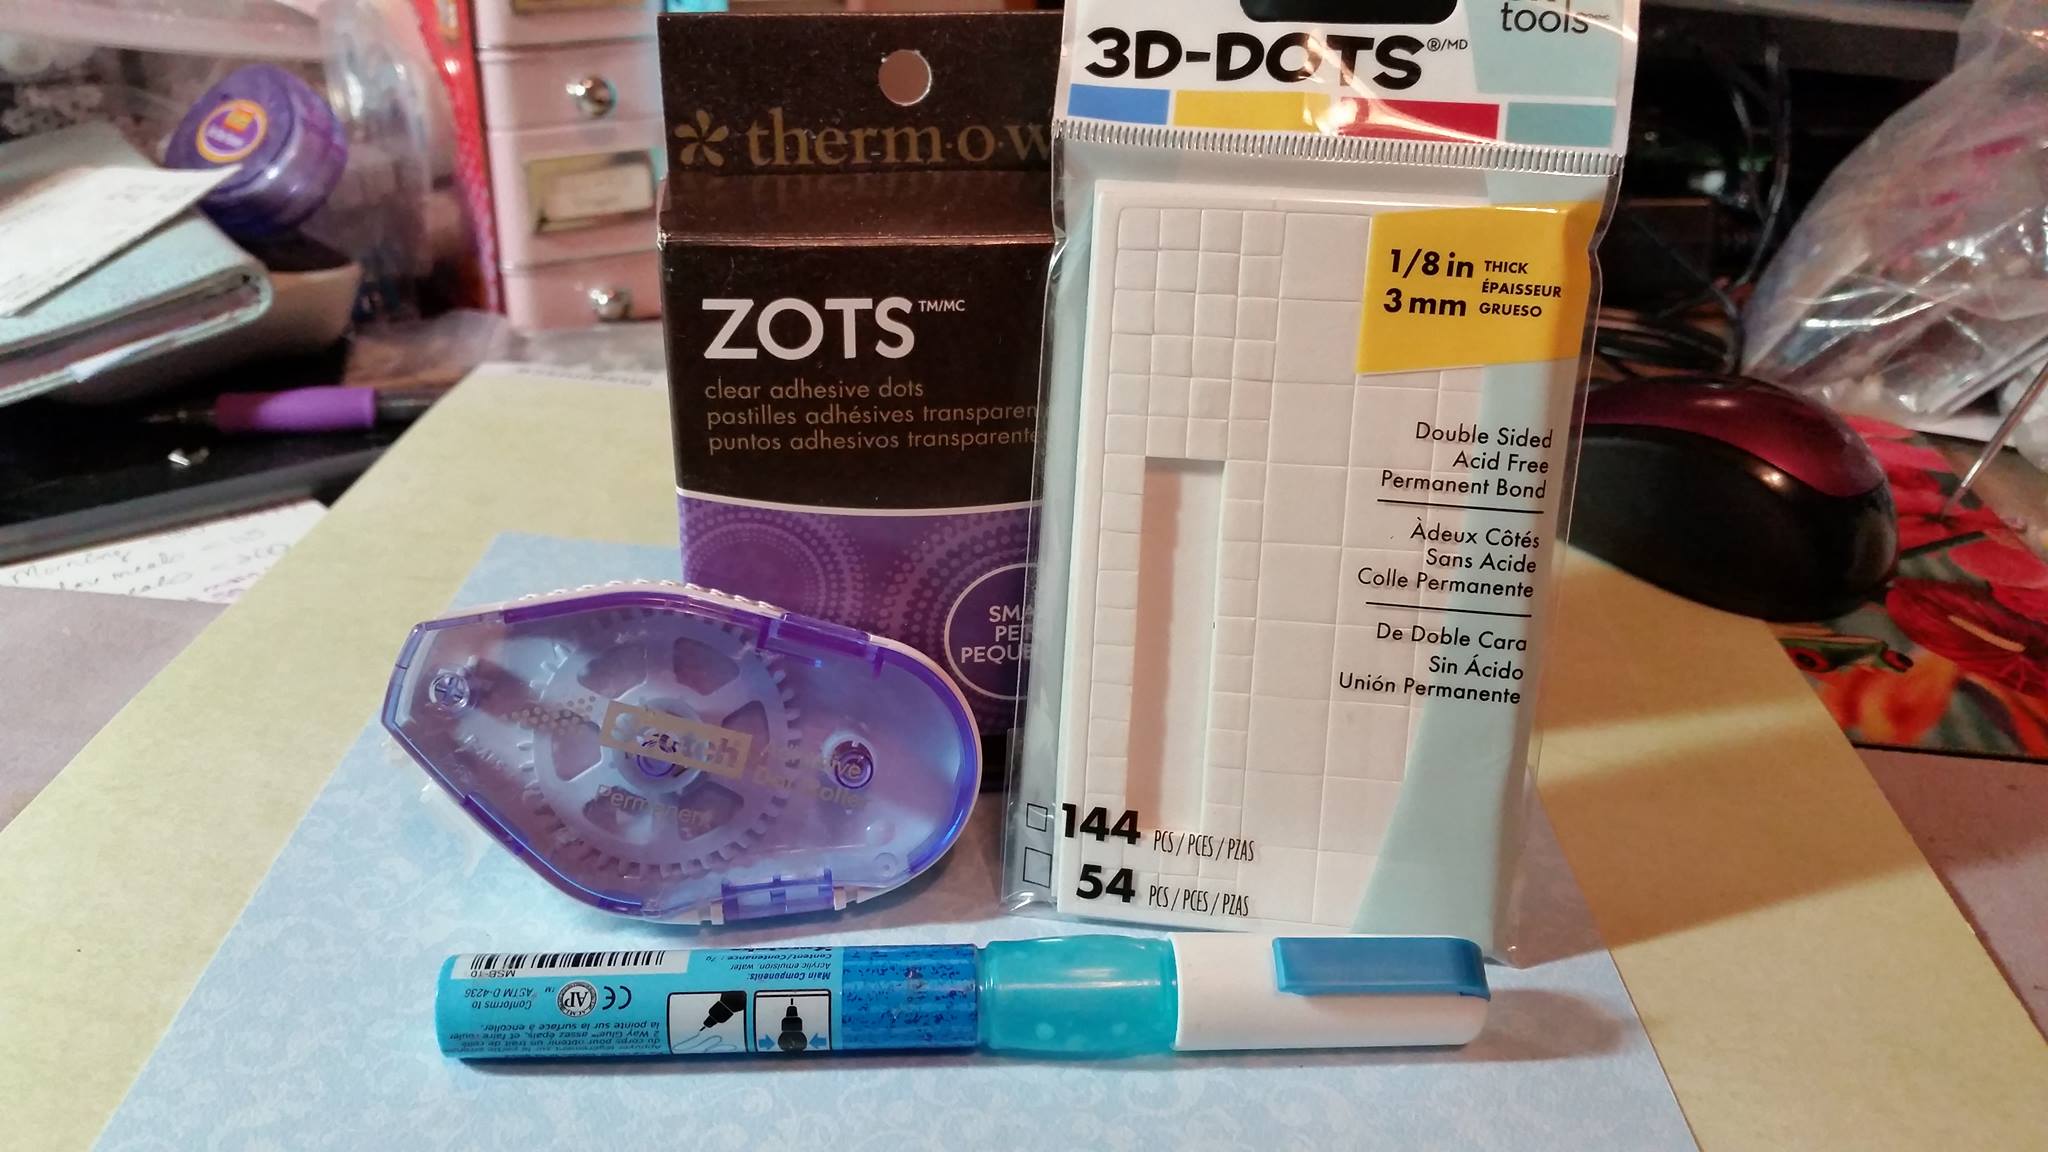
Here’s a group of some of my favorites:


Adhesive Assortment

Adhesive Assortment


 These are probably the adhesives I use the most – a Scotch dot roller, a Zig Glue pen, pop dots, and glue dots.  The other adhesives I also use ,but which are not pictured here, are Scor-tape (a strong double sided tape that can be torn into the proper size) and Scotch Quick-Dry adhesive.  So how do you know when to use what?  It really depends on the object you are trying to adhere (the weight of the object as well as the porosity) along with the surface you are gluing too.  I thought it might be fun to go through the construction of a scrapbook layout to see exactly when I choose which adhesive.


Right now I’m working on a bunch of baby albums – seems like all my friends have babies or grandbabies on the way!  I love giving small handmade brag books as gifts – they’re personal, unique, and recipients always love them.   I always include a “Coming Home” page for when the family comes home from the hospital – one of the first big events in baby’s life!  This is the page I decided on:


Coming Home Layout

Coming Home Layout


First I need to create the background; for this page, I’m adhering the green wavy “grass” to the blue sky… that’s basic paper to paper on a fairly large scale, so I’ll my Scotch adhesive dot roller:


glue 9dd


Dot roller on grass

Dot roller on grass


Dot rollers use a series of dry, tacky “dots” which are transferred from the roller onto the paper as you literally “roll” the tool across the paper.  The advantages to dot rollers is that the adhesive is easy to apply, it is immediately tacky, and if you set your item down lightly it can be moved without too much trouble if you make a mistake.  If you make lots of mistakes, or like to lay things out and move them out, there is a repositionable cartridge refill; I’ve never used them, but the option is available.  Because dot roller adhesive is dry, the surface of the paper doesn’t buckle or smear.  They are moderately priced; there are cheaper options and more expensive options out there, so they fall pretty much in the middle, but I think the ease of use trumps slightly cheaper options; and, they work really well, so no need to move to more expensive options.  When they first came out they were very difficult to refill and involved a Masters Degree in engineering, but the Scotch brand is super easy – open the case, pop out the used cartridge and replace with a new refill cartridge.


Now I want to make my house – it involves a lot of tiny die cut pieces:


Elizabeth Crafts deconstructed house die cut

Elizabeth Crafts deconstructed house die cut


Yikes, right?  How am I going to adhere all those tiny pieces?  My dot roller is out… the pieces will either tear or just roll up into the tool.  This is where I like to use my Zig glue pen… the glue can be used two ways.  When it comes out of the pen it’s blue… if you adhere your item right then, the bond is permanent.  If, on the other hand, you allow it to dry until it is clear, it is repositionable.  To create my house I wanted permanent bonds, so I used it while still blue and wet:


Zig glue pen on window frames

Zig glue pen on window frames


Assembled window

Assembled window


Zig glue on house eaves

Zig glue on house eaves


House assembled

House assembled


Now that the house is assembled, it’s cute, but maybe needs a little something extra.  I decided I wanted to add a little button heart on the door.  Buttons are smooth and a little heavier than paper, so we need to think of another adhesive option.  The Scotch quick dry glue would work, but would need a little time to set.  Glue dots are a great option because they’re fairly cheap, easy to apply, and have a very strong bond.  They come on sheets:


Glue dots on backing paper

Glue dots on backing paper


And you just apply them right to your embellishment:


Press embellishment into glue dot

Press embellishment into glue dot


And then stick it on your layout:


Embellished house

Embellished house


Instant, strong bond!  Now my little house is complete AND looks super cute.  Since the house is paper and the overall weight isn’t that much, I used my dot roller to adhere it to the layout.  Next I wanted to create the photo mat.  For this particular layout, I used an old scrap I had that was flocked:


Flocked paper

Flocked paper


See the little blue dots that are fuzzy?  Sometimes when papers have additional material, like flocking, glitter, or embossing, manufacturers will use a slightly thicker paper base, or coat the paper in chemicals that make them curl slightly.  My flocked paper was thicker and looked a little curled, so instead of my dot roller I opted to use my Scor-Tape.  Scor-tape is double sided adhesive on a roll; it’s created so you can just tear off the amount you need, but the bond it creates is very strong.  I applied the Scor-Tape to the back of the photo mat.


Scor-tape on flocked paper

Scor-tape on flocked paper


But wait – I decided I wanted to dress up my photo mat a little since my friend’s grandchild is a girl and my friend is the definition of a girly-girl, so I decided to add some ribbon and a bow.  Ribbon is deceptive – a lot of people want to use liquid glue.  I don’t like to use liquid glue on ribbon as I find it often bleeds through and creates a hard, shiny line on my ribbon.  For ribbon, I use my dot roller:


Dot roller on ribbon

Dot roller on ribbon


You can adhere it only on the ends and wrap them around the photo mat, so you can still slide the photo underneath the ribbon on the front.  I made a little bow from the same ribbon, but I couldn’t use my dot roller on the bumpy bow, so I used another glue dot:


Picking up a glue dot with a bow

Picking up a glue dot with a bow


Glue dot on the back of the bow

Glue dot on the back of the bow


Ribbon and bow attached

Ribbon and bow attached


Here you can see the layout with the house and the photo mat, with the ribbon and bow.  Note that the ribbon is only attached to the back of the photo mat; that way the photo can be adhered beneath it.  The trees are in the picture too; how did I adhere those?  I used my Zig glue pen on the small, thin trunk pieces and my dot roller on the rounded foliage parts:


Dot roller on tree back

Dot roller on tree back


I decided I wanted the tree on the left to stand out a little, so I adhered it to the layout with pop dots:


Pop dots on tree back

Pop dots on tree back


Pop dots are essentially squares of foam that have adhesive on two sides.  You peel the pop dot off it’s backing sheet and adhere it to the item you want to pop up; then you need to peel the backing off the top of the pop dots, and then you can turn it over and adhere it to your layout.


View of bow and popped up tree

View of bow and popped up tree


We’re almost done.  Now we just need a title.  Can you guess which adhesive I’m going to use for skinny paper letters?


Zig glue pen on title

Zig glue pen on title


Yup, back to my trusty Zig glue pen.  I really do love these pens.  Here’s another look at the completed layout:


Coming Home Layout

Coming Home Layout


Deceptively simple – non-scrappers would never guess that we used five adhesives for one project!  If you take classes, I highly recommend you keep a separate stash of adhesives in your class toolkit – you just never know what you’re going to need!


How Do I... Adhesive Schmadhesive...

How Do I.... Basic Stamping

This post will be divided into two segments – in the first, we’ll talk about basic stamping techniques and the stamping I did on this card, using the Stampendous stamp set Pop Up Kitties:


Stampendous Pop Up Kitties Card

Stampendous Pop Up Kitties Card


The idea behind these “How To” posts is to create a basic guides for new learners, so the posts are broken down into step by step guides.  So, in this post we’ll talk about the stamping I did on this card, and next week I’ll show you how to use the coordinating Pop Up Kitties Die Cut set.


Pop Up Kitties Cling Stamps and Cutting Dies

Pop Up Kitties Cling Stamps and Cutting Dies


Let’s take a minute to discuss the different types of stamps out there.  There are three basic kinds – wood mounted rubber stamps, rubber cling stamps, and clear cling stamps.  They each have advantages and drawbacks.  The first stamps on the market were wood mounted rubber stamps, like the little monster on the right in the picture below:


Clear Cling Stamps and Wood Mounted Rubber Stamps

Clear Cling Stamps and Wood Mounted Rubber Stamps


These are the highest quality stamps, and thus the most expensive.  They also have serious drawbacks in storage – once you begin to collect them, they become heavy and they take up a lot of space.  They can also be a little difficult to use because the wood block acts more like a door than a window – you can’t really see what you’re doing.  Practice and experience and a good positioning tool can help you overcome this drawback.  The plus side for wood mounted stamps?  They last the longest and you will get the best possible image using them.  The carved rubber holds up to a lot of wear and tear – a lot more than the average stamper ever needs, and thus these are pretty much a life time purchase unless you seriously abuse your stamps.


The clear mounted stamps on the left are great because they’re pretty cheap (the set costs about as much as the one wood mounted stamp!), and you can see what you’re doing as you stamp, making placement of the images a lot easier.  They’re also great much easier to store than the wood mounted rubber stamp.  The drawbacks – they don’t hold up as well as rubber and the images are not quite as fine.  The chemicals in stamping ink and stamp cleaner, the constant peeling and resticking of the stamps to the clear blocks, and even air make the stamps brittle over time and they will begin to curl and crack if not cared for properly.  Because they are a soft, jelly like plastic, it’s very easy to squish and smear them, and the lines just aren’t as fine as carved rubber – take a look at the rubber image:


Stampotique Little Hoo-Hoo

Stampotique Little Hoo-Hoo


And now the clear image:


Darcies Ho Ho Hoot Stamp Set

Darcies Ho Ho Hoot Stamp image


(I just realized I used two owl stamp sets in my example – a complete hoo-incidence!) If you look very, very carefully at the image from the clear stamp, you can see that the lines are a little thicker and there are some minor flaws here and there; that being said, when you actually look at the two together the differences aren’t really that tragic, and once you color them no one but you will know or care whether you used clear mounted or wood mounted:


Image Samples Side by Side

Image Samples Side by Side


Now, the rubber cling mounted set I used in this example kind of gives us the best of both worlds.  These stamps are cheaper than wood mounted, easier to store, and mount on clear blocks while you’re stamping them, so you can see better than you can with wood mounted stamps.  And, the stamping side is still the carved rubber, which gives you the improved image quality.  You get a little bit of everything with the rubber cling mounted option!


To start this card, I gathered my supplies.  There are really three basic things to consider when choosing materials and they all start with one question – what are you going to use to color your image?  There are lots of options out there, ranging from colored pencil to watercolor to different types of markers.  If you are using a water based product to stamp with, you need to make sure your stamp ink and paper won’t react poorly with water.  If, as in this instance, you are using an alcohol based stamp ink, you choose materials that don’t react with alcohol.  The good folks down at Everything Scrapbook and Stamps can definitely help you with that if you’re not sure.  Now, I knew I would be using Copic markers to color my images, which are alcohol based, so I picked the following supplies:


Cling stamp set, clear block, Copic paper, and Momento ink

Cling stamp set, clear block, Copic paper, and Momento ink


First, Momento Ink by Tsukineko, which is a great ink for most mediums.  It is a dye ink that, once dry, won’t react to most water based or alcohol based coloring mediums.  It dries quickly and is useful on both porous and smooth surfaces.  Speaking of smooth surfaces, that’s Copic paper in the background… a specially made paper that has a smooth texture for superior blending when using alcohol inks.  The last thing I needed was a clear block to place my stamps on; well, it used to be clear…you can see this one is well loved :)


To begin, peel the cling stamp off of the clear storage film and place it directly onto the clear block.


Peeling stamp from clear storage paper

Peeling stamp from clear storage paper


Make sure the block is fairly clean because anything that is on it will interfere with the cling action of your stamp, and over time the stamp can actually lose it’s ability to cling.  If this happens, it can sometimes be restored by rinsing the stamp in water and allowing it to air dry with the back facing up, but sometimes the cling surfaces get damaged beyond repair and lose their ability to cling completely, so take care of your stamps!


Next, you need to apply ink to your stamps.  I think the best way for most beginning stampers is to actually place the block down on your desk surface and tap the ink onto the stamp.  I’m going to steal a saying here from a lovely designer who brings much creativity and awesomeness to our store when she visits, Dyan Reaveley.  Dyan always says to apply your ink to your stamp using fairy steps instead of elephant steps.  In other words, don’t pound the ink into your stamp.  Doing so will put too much ink on your stamp, causing a fuzzy or smeared image.  It also puts ink on your block, ink on your hands, and extra ink on your paper where you don’t want it.  Plus, it’s mean.  Stop abusing those stamps!!  Gentle tapping until the entire surface is covered is all you need:


Inking the stamp

Inking the stamp


Now turn the block over and press onto your paper with steady, even pressure:


Stamp the Image

Stamp the Image


A lot of people are tempted to stand and lean on their stamps, or rock them back and forth.  Not only do you not need to do this, it’s another great way to mess up your image.  First, make sure the surface you’re stamping on is actually flat and solid.  If it has give, a lot of times little areas of the image don’t come out because of a flaw in the surface, not the stamp.  If you can’t get a good image, try placing the paper on a rubber stamping surface mat.  These will typically even out any problems you have with your stamping surface and provide much clearer images.


Pop Up Kittie face

Pop Up Kittie face


Voila!  We have a stamped image.  I stamped all the images I would need for my card, allowing my clear block to help me stamp images fairly close together to help save paper:


Stamping images close together

Stamping images close together


Next, I colored all my images.  I generally choose colors based on the papers I’m using, so I had those already picked out:


Colored images

Colored images


These papers are from Authentique’s Devoted Collection, a fun new collection we got in at the store that’s dedicated to our pet friends:


Authentique Devoted Collection

Authentique Devoted Collection


Next week I’ll show you some tips to use the accompanying die cut set and I’ll finish assembling the card, so be sure to log back in and check it out!


How Do I.... Basic Stamping
How Do I... Basic Die Cutting

Last week we shared this cute little Kittie pop-up card, which involved a two step process – stamping and die cutting.


Stampendous Pop Up Kitties Card

Stampendous Pop Up Kitties Card


We created it using these great new companion sets from Stampendous:


Pop Up Kitties Cling Stamps and Cutting Dies

Pop Up Kitties Cling Stamps and Cutting Dies


Last week we focused on the basic stamping techniques used to create the card; this week, we’re going to focus on how to use the die cuts to cut out your stamped images so you don’t have to do it by hand… yay!


First, we stamped all the images and colored them using Copic markers. (The patterned papers for the card were already selected, which made choosing the colors for images much easier).


Colored images

Colored images


So, to get started there are basically two ways of doing this.  First, you can simply place the appropriate die over your stamped and colored image, tape it in place, run it through your die cutting machine and hope for the best.


11840650_10153473963530856_383236265_o

Placing a die directly over a stamped image


That will certainly work, and it’s a great option if you’re not an extremely precise person.  Now, if you ARE an extremely precise person, you might want to check out the second option.  First, you die cut the appropriate shape on a piece of scrap paper:


Place your die on a piece of scrap paper and roll it through your machine

Place your die on a piece of scrap paper and roll it through your machine


When you are done, you will have completed a mask:


Mask shape

Mask shape


Now, you place your mask over the stamped image to see precisely where the die will cut:


Place the mask over the stamped image

Place the mask over the stamped image


Place the die right inside the mask and tape it in place:


Cutting die taped into mask - don't forget to use repositionable tape!!

Cutting die taped into mask – don’t forget to use repositionable tape!!


Now when you roll the die through the machine your cutting will be just a hair more precise – check out the difference:


11847182_10153473987030856_1298042298_o

The mask method is on the left, and using the die cut directly on the image is on the right.


It’s a very small difference and only type A people would ever even notice… but, there are some upsides to knowing how to do the mask method.  First, once you create the mask you can keep it with your dies, and that way you don’t have to spend the time and paper to make one every time:


Store your masks with your dies

Store your masks with your dies


Second, some dies really do need the mask.  The basket die in this set actually cuts out the basket handles for you, which would be extremely hard to line up precisely without using a mask:


11821552_10153474004415856_752270976_o

Isn’t it awesome that you wouldn’t have to cut out those little handles???


Once all your shapes are cut out, you can begin assembling the card.   We adhered all the background papers to the card base, then assembled the die cuts on the circle before adhering it to the card:


11831866_10153474026195856_1478497984_o

Pop up kittie die cuts assembled


Once that was done, we simply embellished the card with baker’s twine.  First, we wrapped the twine around a paper disc to create the ball of yarn.  Then we allowed the twine to come up and make cute little knot all over our kitties head.  A computer printed sentiment and a few black gems finished the card – really, with all the cute papers and the adorable little kittie, not much else was needed!


11836493_10153474083060856_1006976283_o


How Do I... Basic Die Cutting

How Do I... Trimmer Tricks Part One

This week it’s time to focus on one of the most controversial and confusing scrapbooking topics of all time – how to use your paper trimmer!  No, really, this is a hot topic.  Many, many times people come in to the store looking for a new trimmer because they hate their old one, or don’t know how to use it.  Or because they’ve thrown it out the window.  Really, people are passionate about their paper trimmers.


Let’s go over the basics.  There are several different kinds with different features as well as pros and cons.


Guillotine trimmer

Guillotine trimmer


This is your basic guillotine style trimmer.  You lift the handle up, pull it down, and voila, cut paper.  These trimmers are pretty precise as long as you have a good hold on to the paper as you’re lowering the handle… if you let go, it will move and you’ll have a crooked cut.  Pros: They can cut more than one piece of paper at a time, you don’t have to buy replacement blades, they’re fairly sturdy and hard to damage, and as long as you hold the paper in place, they’re very accurate.  Cons: They’re initially a little more expensive than your standard paper trimmer, they’re difficult to carry if you like to travel with your trimmer, and it’s hard to cut small pieces with them.  There’s also no scoring with these guys – just a solid cutting tool.  These are a love ’em or leave ’em kind of trimmer… people either love them and swear by them, or they use them once and never use them again.  I personally am not a fan of these for everyday use, but that doesn’t mean you won’t be.


Rotary Trimmer

Rotary Trimmer


Rotary blades

Rotary Trimmer


The next style of trimmer is a rotary trimmer – these trimmers use a strong track with a circular blade attached that you pull towards you and cut your paper like a pizza…  this will be familiar to you if you like pizza or quilting.  It’s the same principle.  Here’s a close up of the blades:


trimmer8

Rotary Trimmer Blades


Pros for rotary trimmers – they are very accurate and the replacement blade last a fairly long time compared to a standard paper trimmer.  They’re also pretty sturdy and can cut slightly smaller pieces than the guillotine style trimmers.  Some of them also come with blades that cut in patterns – like waves or scallops.  That’s a pretty cool feature that no other trimmer can claim.  They do also have blades for scoring and perforating, which is nice if you’re not comfortable with paper folding or your making complicated folds.  Cons – They again are usually a little more expensive, it’s hard to see where you’re cutting sometimes, they’re bigger and bulkier and slower to use than the standard style paper trimmer.  At least for me – I’ve tried several versions of these and I always end up going back to a standard trimmer.  Maybe that’s just what I’m comfortable with.  The blades in these trimmers are also slightly more complicated to change than with a standard trimmer, although that’s only important if you like to be speedy.


So this is what I’m referring to when I say “standard” trimmer…


11847552_10153520401720856_1997738427_o

Fiskars Triple Track Trimmer


This trimmer works by pulling a stationary blade straight through your paper.  The little orange square is the blade… it’s sharpened on both sides so as it gets dull you can flip it around.  There clear “track” that the blade rests on has a little divot on one side that makes changing blades quick and easy… you literally pop the old one out and pop a new one in.  Cons – These trimmers are not the most accurate in the world… the tracks wear down over time and spread apart as you pull, causing a little blade wobbliness.  However, for me, the rest of the features make up for the very slight wobble you experience.  You do have to change the blades on these trimmers much more frequently than the rotary style… think of the difference between keeping a pizza cutter sharp versus a paring knife.  You still have the sharpen the pizza cutter every once in a while, but not nearly as often as you do a paring knife.  It’s kind of like that.  Pros for this trimmer – they’re inexpensive, they’re light weight, and they’re quick and easy to use.  1.. 2.. 3 and you’re done.. this works for me.  Fiskars has attempted to solve the blade wobble problem by inventing the triple track system:


Triple track blade

Triple track blade


See how the little feet on the outside edges of the blade fit into grooves in the track?  They’re supposed to eliminate the wobble, but I’ve noticed that over time the track eventually wears down and the wobble comes back.  However, we’re talking about a sixteenth of an inch generally… so it’s almost unnoticeable by most people and in most projects.  So, it’s a great, inexpensive trimmer to get if you want to work quickly or you go to a lot of classes, as it’s much easier to tote and use in small spaces than the other trimmer styles.


Once you decide on the style of trimmer you want, you still have to figure out how to use it.  So, let’s go over some basic guidelines and then we’ll have a tutorial on measuring while we create a cute card.  First of all, lets take another look at the triple track trimmer:


Getting to know your trimmer

Getting to know your trimmer


Sorry – I tried to show some detail but the tags are smaller than I thought they’d be.  You can see it better if you click on it.


Things to note: first, this is the way I always use my trimmer – most people think it’s upside down because the numbers are upside down.  However, if you think about it you’ll realize all is right with the world… first, the numbers ascend correctly.  That is, zero is still on the left and the numbers get higher as you move to the right, just like on a number line.  When you turn the trimmer the opposite way, so that the numbers are right side up, the zero ends up on the right and the numbers ascend to the left, which is just odd.


Now, there are other actual functional reasons I keep my trimmer turned like this.  First, now your measuring guide is closer to you, which just makes it easier to see.  Second, pulling is easier and more accurate than pushing.  You are usually more stable and able to control the trimmer when you are pulling the blade towards you rather than when you are pushing the blade away, which would mean you would have to clamp down tightly on the trimmer so it doesn’t slide away from you.  See that clear little ledge right below the 1″ and 2″ mark?  That functions as a T square; that is, when you place your paper in the trimmer and you pull it flush against that ledge, you know your paper is straight in the trimmer.  So, I always push the blade up the track so its furthest from me, place my paper in the trimmer at the proper measurement and flush with the little clear ledge and then pull the blade towards me, making a quick, straight cut.


A lot of people are confused by the simple act of measuring.  This is nothing to be ashamed of as, I mean this when I say it – this confuses a lot of people.  I’m going to break it down here, but an afternoon of practicing with rulers and fractions never hurt anybody and will make your life much simpler in the future if this is an area of confusion for you.  Please don’t think you are not capable of figuring this out, because you are.  It just takes a little patience and a little practice.


First, you’ll notice I circled the area in the center of the track – this is where your cut is happening.  Thus, this is ground “0” – your measurements start from here.


As you look from the 0 to the right, you’ll see some numbers.  Again, don’t worry about the fact that they’re upside down.  That’s just aesthetics.  They are in absolutely the correct order and you should treat them as such.


Let’s do a little fraction review.  When you have a “whole” something, you have 1, correct?  Let pretend we’re cutting a pizza, since we’ve already talked about pizza and it’s an easy fraction analogy.  And, I’m starting to think I want some pizza.  But that’s for another time.  OK, so you take your pizza out of the oven and before you make any cuts it’s completely whole, so it’s one. So, going back to our trimmer, from the 0 in the center of the track to the 1 is 1 inch.  Got it?  Good…


Whole Pizza... mmmmm

Whole Pizza… mmmmm


Now, let’s say we want to share our pizza with a friend.  I’m not sure why we would do this, but hey, sharing is caring, right?  Now, we take our cutter and cut right down the middle of our pizza.  Now we have two pieces, and each piece is one half of the original pizza.  (I know your eyes just glazed over, and probably not because I’m talking about pizza, but just hang in there… this is easier than you think!)


One-half of a pizza

One-half of a pizza


Not surprisingly, if you cut an inch in half, you also get two halves.  Funny how math works like that.  SO, if you go back to our trimmer, you’ll note that the lines directly on a number and the lines that exactly divide those numbers – the half marks – are a little darker than the other lines on the trimmer.  So, if you know you need to cut something 1 1/2″, you look first at the one, then move to the right another 1/2″ to the dark line and there you have it… 1 and 1/2″.  Follow?  You should be able to find it on the picture above because I put a little tag on the 1 1/2″ line.  It works the same as you move down the ruler – so, take a minute now and see if you can find all the halves in the trimmer picture above – you should be able to find 2 1/2, 3 1/2, 4 1/2 and 5 1/2… the picture cuts off before you get to 6 1/2.


OK, so that’s halves.  Now, much of card making and scrapbooking relies on the next measurement – the quarter inch.  Don’t go away yet… you can do this!  A quarter inch is just like a quarter of a pizza or a quarter in money – it is 1/4 of a whole.  So, a pizza cut in quarters would have 4 total pieces.  It takes four quarters to make a dollar.  And, it takes four quarter inches to make an inch.  Look backup at the trimmer – you’ll see there are lines on all the quarter inch marks as well.  In fact, if you start at the 1″ mark and count the number of long lines on the base of the trimmer until you get to 2 inches, you’ll see that there are…. yes, 4 of them (don’t count the line on the 1″ mark).  So, if you need to cut something 1 1/4″, you start from your 0, move to the right 1 full inch, and then one of the quarter inch marks.  I have marked this on the picture.


Now, if you think about math a little, you’ll see the long lines go 1″, 1 1/4″, 1 2/4″, 1 3/4″ and 2″.  But, in math we’re always simplifying things, right?  So, instead of saying 1 2/4″, we’d say 1 1/2″.  So, look at it again, and you’ll see 1″, 1 1/4″, 1 1/2″, 1 3/4″, and 2″.  It’s not that hard, right?


Do you know what the smaller marks on the ruler are – the ones that don’t have full lines but just tiny tick marks?  Think about the pizza again – if you had cut your pizza into four slices it would be yummy, but hard to eat.  Most pizzas are cut into… eighths!  So, if you cut each slice in half, you’d have eight slices.  On the ruler, if you cut 1/4 in half, you get 1/8″.  This is another useful measurement to know, as a lot of margins in scrapbooking and card making are measured by the eighth inch.


Now, lets say you have to feed a soccer team, but you still only have one pizza.  You need more than eight slices, so what do you do?  You cut the slices in half again… making 16.  So, each 1/8 mark is divided again into 16th marks.  When you look at the trimmer, the eighth marks are slightly longer and darker than the 16th marks, so you should be able to see them easily if you know what you’re looking for, but if you don’t, just count the marks between the inches.  There are 8 eighth marks between inches, and 16 16th marks.  Make sense?


I found some kid’s ruler quiz on the internet which breaks it down pretty good – study this and practice on your own ruler and you’ll be a pro in no time!


ruler


I’m thinking this is probably enough for our bruised little brains today, so next week tune back in and I’m going to demonstrate how to use your trimmer while creating this super cute card:


Gorjuss Little Things Card Sample


Ooohhh – look at all the lovely cutting!  If you’re wanting to look for the products used to make this card, ask Michelle about the Gorjuss Little Things Sweet Tea stamp set and Authentique’s Infused Collection – I used the 6×6 pad and the Infused Elements stickers.  See you next week!


11900892_10153520394795856_1739094343_o


How Do I... Trimmer Tricks Part One