October 11, 2015

How Do I... Choose A Scrapbook Album

For beginning scrappers, the overwhelming number of album choices out there can be downright intimidating.  So, since I’m writing this How To series on basic scrapbooking, I thought, we need to cover album choices!  Albums come in many shapes and sizes, all designed to fit different needs.  Lets take a look at a few of the basics.


For someone who just wants to do layouts, you could choose a traditional scrapbook in a few different sizes: 12×12, 8×8, 6×6, and now they even have 4×4!


12x12 Albums

12×12 Albums


Now, in addition to size, you may want to consider how albums are constructed.  Some albums come as a basic D-Ring system:


D Ring Album

D Ring Album


These are great because they’re typically less expensive, and adding and/or moving pages is super simple.  Just open your D-ring and move away!  Disadvantages are that they don’t look quite as elegant as some of the other options, and sometimes the plastic wears and the pages begin to hang down.


If you like a slightly upscale style, you might want to go for a post bound album:


Post bound spine

Post bound spine


These look beautiful and they’re slightly sturdier than the D-Ring option.  However, moving the pages around and adding pages is more difficult because you have to unscrew the spine and disassemble the entire album every time you want to make a change.


Close up of spine of post bound album

Close up of spine of post bound album


Some people who prefer the post bound album create all their pages first, protect them in a box until they’re done, and then assemble the entire album at once.  So, it really comes down to appearance versus convenience.


These kind of scrapbooks now come in two page options as well.  You can go the traditional hand created page route:


12x12 Layout by our friend Beatriz Guzman

12×12 Layout by our friend Beatriz Guzman


Or, now, you can choose from several very quick and easy pocket page systems:


12x12 Pocket page system

12×12 Pocket page system


These systems come with page protectors that come pre-divided.  You can then purchase premade inserts for the pockets, or create your own.  I was really intrigued by the new little 4×4 Instagram albums we got in at the store – take a look at how easy it is to put a layout together:


4x4 Instagram Album

4×4 Instagram Album


Album Spine with Label

Album spine with label for organizing your albums


Interior pages of Instagram Album

Interior pages of Instagram Album with full 4×4 pages and divided pages with 2×2 pockets


I picked up one of these albums and a little box of We R Memory Keeper Album Made Easy Die Cuts:


Albums Made Easy Die Cuts

Albums Made Easy Die Cuts


I printed out some pictures of my daughter in 2×2 inches and 4×4 inches, picked out a few of my favorite die cut pieces, and went to town:


Layout die cuts and photos

Layout die cuts and photos


A few rub-ons and a corner rounder make easy inserts

A few rub-ons and a corner rounder make easy inserts


A few rub-ons, a little washi tape, and a simple heart embellishment… Bada-Bing, Bada-Boom, my layout was done:


Completed layout in Instagram Album

Completed layout in Instagram Album


These albums are really great options for beginners, young scrappers, or those who just don’t have a lot of time.  They’re quick and easy and since the die cuts are themed you can make everything match pretty with very little effort.


Back to scrapbooking albums.  If you like this process, you may want to check out some of the small themed albums from Simple Stories – they have several different sizes and themes.  You can pick the pocket pages you want, the insert theme, and go to town.  The chipboard album covers can be decorated as well, so these are very personal albums.


Simple Stories travel album and pocket inserts

Simple Stories travel album and pocket inserts


Now, if you really want to be quick and easy, try a Smash book.  Smash books are journal style books that come with pre-designed page backgrounds:


Smash book and view of some interior pages

Smash book and view of some interior pages


You can use the background or cover it… the books come in multiple themes and they’re intended for very informal scrapping.  You can draw, cut and paste, adhere ephemera – what ever floats your boat.  I keep Smash journals with me whenever I travel – I spend each night in my hotel room recording what I did that day; that way, when I eventually have time to go back and formally scrapbook my trip, I won’t have to work to remember anything – it’s all right there!


Smash books utilize a free form style and allow for ephemera

Smash books utilize a free form style and allow for ephemera


So, you see, there really is something out there for everyone!  If you’re still not sure, be sure to come in and talk about your album with us at Everything Scrapbook and Stamps… we can help you decide which will be the best option for you.


How Do I... Choose A Scrapbook Album

How Do I... Adhesive Schmadhesive...

Did you ever pack a small tool kit for your favorite scrapbooking class, only to discover you brought the wrong kind of adhesive?  Ever buy a nice looking “all purpose” glue only to find that it didn’t really fit all of your purposes?  Ever picked a cool embellishment out of your stash and wondered how in the world you were going to make that stick?


One of the most common questions we get in the store is, “Which adhesive do I need for this?”  It can be a little intimidating staring at an 8 foot long display of tapes, liquid glue, glue tabs, glue dots, pop dots… and the list goes on.  Do you really need all of those different things?  The answer is yes and no.  You don’t need one of every type of adhesive you’ve ever seen, but unless you have very little variety in your work, you are going to need a few different types of adhesive to meet all your paper crafting needs.  We thought it might be useful to show you a basic scrapbooking layout and discuss a few adhesives that we believe every paper artist will need.


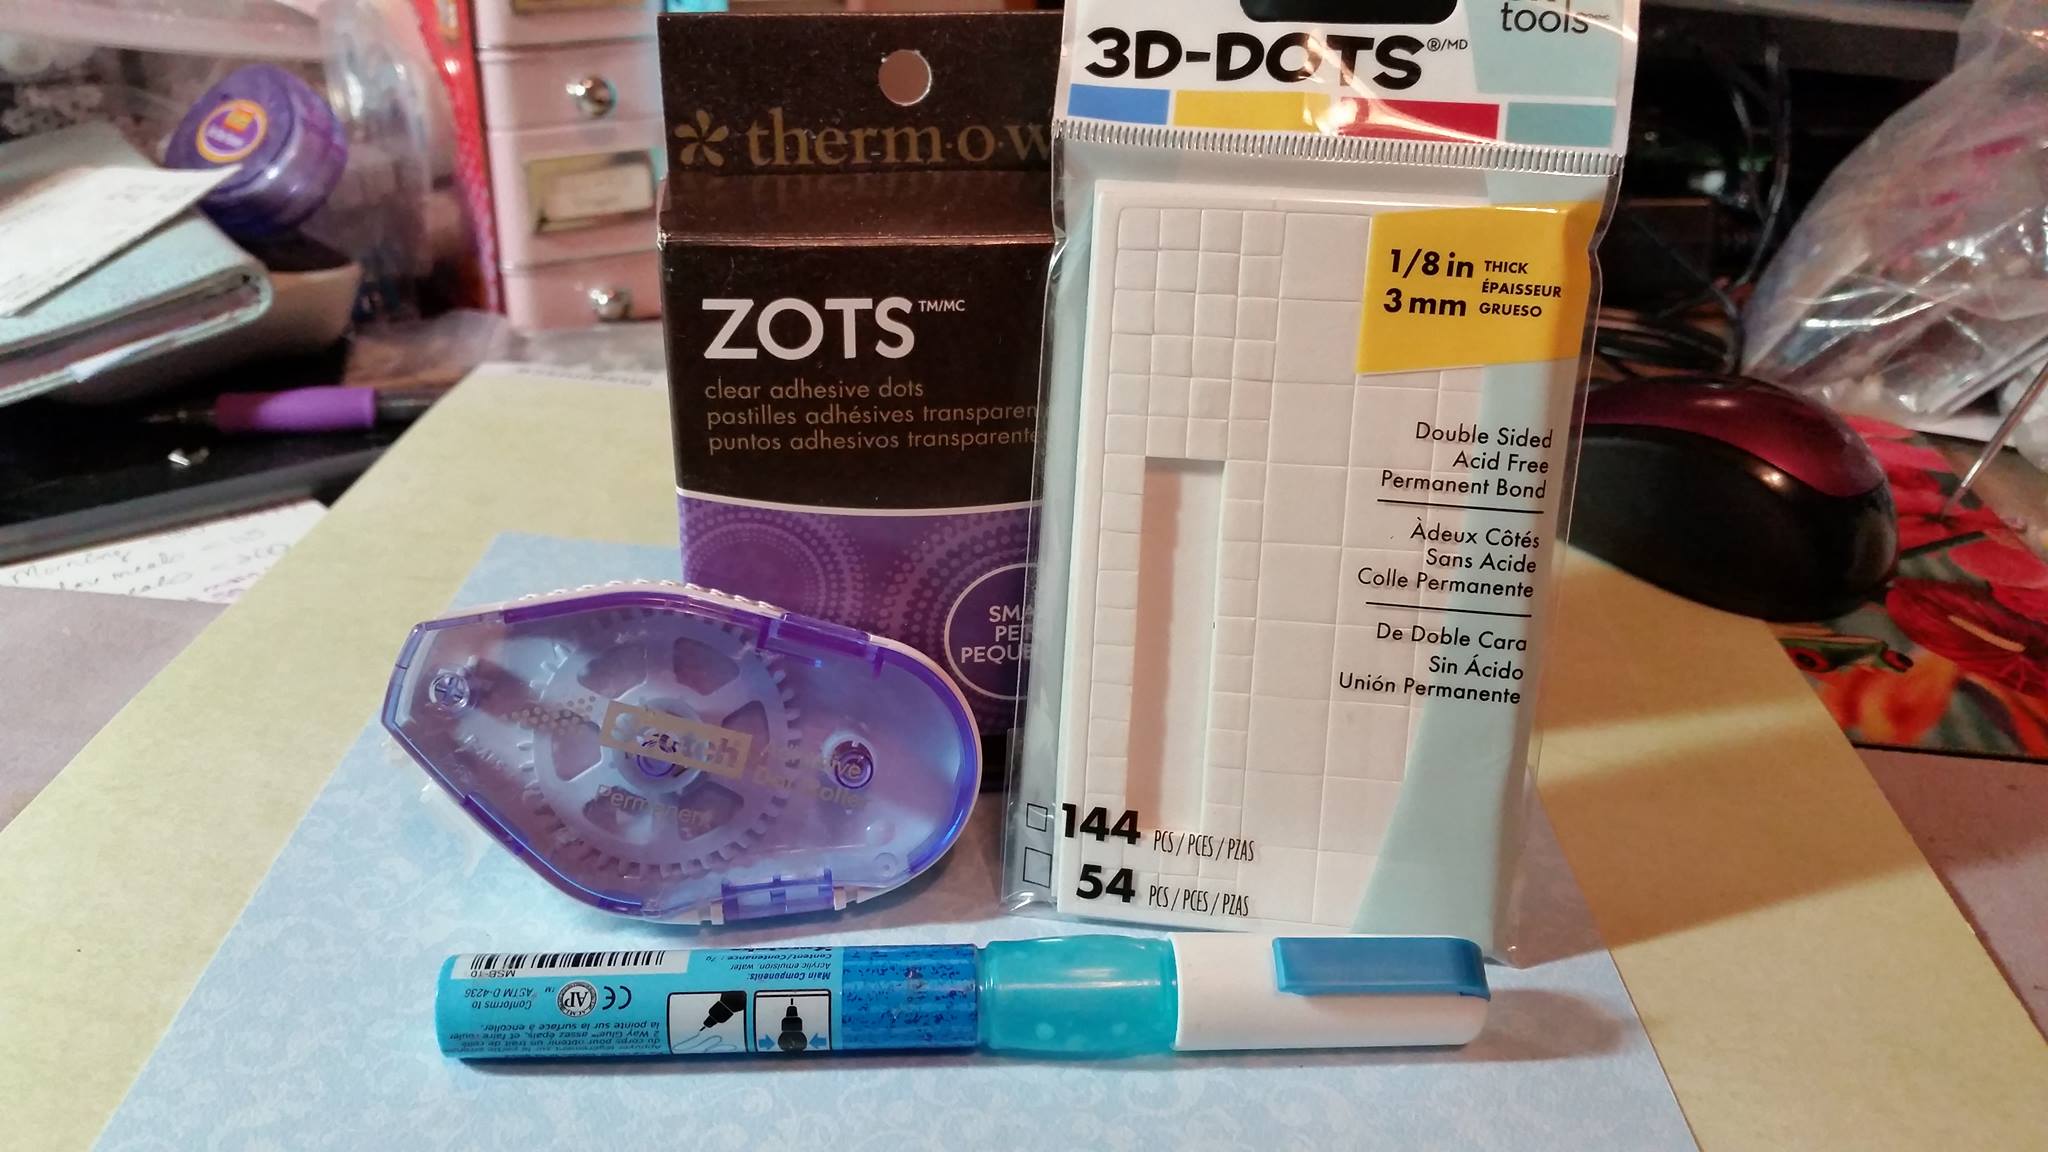
Here’s a group of some of my favorites:


Adhesive Assortment

Adhesive Assortment


 These are probably the adhesives I use the most – a Scotch dot roller, a Zig Glue pen, pop dots, and glue dots.  The other adhesives I also use ,but which are not pictured here, are Scor-tape (a strong double sided tape that can be torn into the proper size) and Scotch Quick-Dry adhesive.  So how do you know when to use what?  It really depends on the object you are trying to adhere (the weight of the object as well as the porosity) along with the surface you are gluing too.  I thought it might be fun to go through the construction of a scrapbook layout to see exactly when I choose which adhesive.


Right now I’m working on a bunch of baby albums – seems like all my friends have babies or grandbabies on the way!  I love giving small handmade brag books as gifts – they’re personal, unique, and recipients always love them.   I always include a “Coming Home” page for when the family comes home from the hospital – one of the first big events in baby’s life!  This is the page I decided on:


Coming Home Layout

Coming Home Layout


First I need to create the background; for this page, I’m adhering the green wavy “grass” to the blue sky… that’s basic paper to paper on a fairly large scale, so I’ll my Scotch adhesive dot roller:


glue 9dd


Dot roller on grass

Dot roller on grass


Dot rollers use a series of dry, tacky “dots” which are transferred from the roller onto the paper as you literally “roll” the tool across the paper.  The advantages to dot rollers is that the adhesive is easy to apply, it is immediately tacky, and if you set your item down lightly it can be moved without too much trouble if you make a mistake.  If you make lots of mistakes, or like to lay things out and move them out, there is a repositionable cartridge refill; I’ve never used them, but the option is available.  Because dot roller adhesive is dry, the surface of the paper doesn’t buckle or smear.  They are moderately priced; there are cheaper options and more expensive options out there, so they fall pretty much in the middle, but I think the ease of use trumps slightly cheaper options; and, they work really well, so no need to move to more expensive options.  When they first came out they were very difficult to refill and involved a Masters Degree in engineering, but the Scotch brand is super easy – open the case, pop out the used cartridge and replace with a new refill cartridge.


Now I want to make my house – it involves a lot of tiny die cut pieces:


Elizabeth Crafts deconstructed house die cut

Elizabeth Crafts deconstructed house die cut


Yikes, right?  How am I going to adhere all those tiny pieces?  My dot roller is out… the pieces will either tear or just roll up into the tool.  This is where I like to use my Zig glue pen… the glue can be used two ways.  When it comes out of the pen it’s blue… if you adhere your item right then, the bond is permanent.  If, on the other hand, you allow it to dry until it is clear, it is repositionable.  To create my house I wanted permanent bonds, so I used it while still blue and wet:


Zig glue pen on window frames

Zig glue pen on window frames


Assembled window

Assembled window


Zig glue on house eaves

Zig glue on house eaves


House assembled

House assembled


Now that the house is assembled, it’s cute, but maybe needs a little something extra.  I decided I wanted to add a little button heart on the door.  Buttons are smooth and a little heavier than paper, so we need to think of another adhesive option.  The Scotch quick dry glue would work, but would need a little time to set.  Glue dots are a great option because they’re fairly cheap, easy to apply, and have a very strong bond.  They come on sheets:


Glue dots on backing paper

Glue dots on backing paper


And you just apply them right to your embellishment:


Press embellishment into glue dot

Press embellishment into glue dot


And then stick it on your layout:


Embellished house

Embellished house


Instant, strong bond!  Now my little house is complete AND looks super cute.  Since the house is paper and the overall weight isn’t that much, I used my dot roller to adhere it to the layout.  Next I wanted to create the photo mat.  For this particular layout, I used an old scrap I had that was flocked:


Flocked paper

Flocked paper


See the little blue dots that are fuzzy?  Sometimes when papers have additional material, like flocking, glitter, or embossing, manufacturers will use a slightly thicker paper base, or coat the paper in chemicals that make them curl slightly.  My flocked paper was thicker and looked a little curled, so instead of my dot roller I opted to use my Scor-Tape.  Scor-tape is double sided adhesive on a roll; it’s created so you can just tear off the amount you need, but the bond it creates is very strong.  I applied the Scor-Tape to the back of the photo mat.


Scor-tape on flocked paper

Scor-tape on flocked paper


But wait – I decided I wanted to dress up my photo mat a little since my friend’s grandchild is a girl and my friend is the definition of a girly-girl, so I decided to add some ribbon and a bow.  Ribbon is deceptive – a lot of people want to use liquid glue.  I don’t like to use liquid glue on ribbon as I find it often bleeds through and creates a hard, shiny line on my ribbon.  For ribbon, I use my dot roller:


Dot roller on ribbon

Dot roller on ribbon


You can adhere it only on the ends and wrap them around the photo mat, so you can still slide the photo underneath the ribbon on the front.  I made a little bow from the same ribbon, but I couldn’t use my dot roller on the bumpy bow, so I used another glue dot:


Picking up a glue dot with a bow

Picking up a glue dot with a bow


Glue dot on the back of the bow

Glue dot on the back of the bow


Ribbon and bow attached

Ribbon and bow attached


Here you can see the layout with the house and the photo mat, with the ribbon and bow.  Note that the ribbon is only attached to the back of the photo mat; that way the photo can be adhered beneath it.  The trees are in the picture too; how did I adhere those?  I used my Zig glue pen on the small, thin trunk pieces and my dot roller on the rounded foliage parts:


Dot roller on tree back

Dot roller on tree back


I decided I wanted the tree on the left to stand out a little, so I adhered it to the layout with pop dots:


Pop dots on tree back

Pop dots on tree back


Pop dots are essentially squares of foam that have adhesive on two sides.  You peel the pop dot off it’s backing sheet and adhere it to the item you want to pop up; then you need to peel the backing off the top of the pop dots, and then you can turn it over and adhere it to your layout.


View of bow and popped up tree

View of bow and popped up tree


We’re almost done.  Now we just need a title.  Can you guess which adhesive I’m going to use for skinny paper letters?


Zig glue pen on title

Zig glue pen on title


Yup, back to my trusty Zig glue pen.  I really do love these pens.  Here’s another look at the completed layout:


Coming Home Layout

Coming Home Layout


Deceptively simple – non-scrappers would never guess that we used five adhesives for one project!  If you take classes, I highly recommend you keep a separate stash of adhesives in your class toolkit – you just never know what you’re going to need!


How Do I... Adhesive Schmadhesive...

How Do I.... Basic Stamping

This post will be divided into two segments – in the first, we’ll talk about basic stamping techniques and the stamping I did on this card, using the Stampendous stamp set Pop Up Kitties:


Stampendous Pop Up Kitties Card

Stampendous Pop Up Kitties Card


The idea behind these “How To” posts is to create a basic guides for new learners, so the posts are broken down into step by step guides.  So, in this post we’ll talk about the stamping I did on this card, and next week I’ll show you how to use the coordinating Pop Up Kitties Die Cut set.


Pop Up Kitties Cling Stamps and Cutting Dies

Pop Up Kitties Cling Stamps and Cutting Dies


Let’s take a minute to discuss the different types of stamps out there.  There are three basic kinds – wood mounted rubber stamps, rubber cling stamps, and clear cling stamps.  They each have advantages and drawbacks.  The first stamps on the market were wood mounted rubber stamps, like the little monster on the right in the picture below:


Clear Cling Stamps and Wood Mounted Rubber Stamps

Clear Cling Stamps and Wood Mounted Rubber Stamps


These are the highest quality stamps, and thus the most expensive.  They also have serious drawbacks in storage – once you begin to collect them, they become heavy and they take up a lot of space.  They can also be a little difficult to use because the wood block acts more like a door than a window – you can’t really see what you’re doing.  Practice and experience and a good positioning tool can help you overcome this drawback.  The plus side for wood mounted stamps?  They last the longest and you will get the best possible image using them.  The carved rubber holds up to a lot of wear and tear – a lot more than the average stamper ever needs, and thus these are pretty much a life time purchase unless you seriously abuse your stamps.


The clear mounted stamps on the left are great because they’re pretty cheap (the set costs about as much as the one wood mounted stamp!), and you can see what you’re doing as you stamp, making placement of the images a lot easier.  They’re also great much easier to store than the wood mounted rubber stamp.  The drawbacks – they don’t hold up as well as rubber and the images are not quite as fine.  The chemicals in stamping ink and stamp cleaner, the constant peeling and resticking of the stamps to the clear blocks, and even air make the stamps brittle over time and they will begin to curl and crack if not cared for properly.  Because they are a soft, jelly like plastic, it’s very easy to squish and smear them, and the lines just aren’t as fine as carved rubber – take a look at the rubber image:


Stampotique Little Hoo-Hoo

Stampotique Little Hoo-Hoo


And now the clear image:


Darcies Ho Ho Hoot Stamp Set

Darcies Ho Ho Hoot Stamp image


(I just realized I used two owl stamp sets in my example – a complete hoo-incidence!) If you look very, very carefully at the image from the clear stamp, you can see that the lines are a little thicker and there are some minor flaws here and there; that being said, when you actually look at the two together the differences aren’t really that tragic, and once you color them no one but you will know or care whether you used clear mounted or wood mounted:


Image Samples Side by Side

Image Samples Side by Side


Now, the rubber cling mounted set I used in this example kind of gives us the best of both worlds.  These stamps are cheaper than wood mounted, easier to store, and mount on clear blocks while you’re stamping them, so you can see better than you can with wood mounted stamps.  And, the stamping side is still the carved rubber, which gives you the improved image quality.  You get a little bit of everything with the rubber cling mounted option!


To start this card, I gathered my supplies.  There are really three basic things to consider when choosing materials and they all start with one question – what are you going to use to color your image?  There are lots of options out there, ranging from colored pencil to watercolor to different types of markers.  If you are using a water based product to stamp with, you need to make sure your stamp ink and paper won’t react poorly with water.  If, as in this instance, you are using an alcohol based stamp ink, you choose materials that don’t react with alcohol.  The good folks down at Everything Scrapbook and Stamps can definitely help you with that if you’re not sure.  Now, I knew I would be using Copic markers to color my images, which are alcohol based, so I picked the following supplies:


Cling stamp set, clear block, Copic paper, and Momento ink

Cling stamp set, clear block, Copic paper, and Momento ink


First, Momento Ink by Tsukineko, which is a great ink for most mediums.  It is a dye ink that, once dry, won’t react to most water based or alcohol based coloring mediums.  It dries quickly and is useful on both porous and smooth surfaces.  Speaking of smooth surfaces, that’s Copic paper in the background… a specially made paper that has a smooth texture for superior blending when using alcohol inks.  The last thing I needed was a clear block to place my stamps on; well, it used to be clear…you can see this one is well loved :)


To begin, peel the cling stamp off of the clear storage film and place it directly onto the clear block.


Peeling stamp from clear storage paper

Peeling stamp from clear storage paper


Make sure the block is fairly clean because anything that is on it will interfere with the cling action of your stamp, and over time the stamp can actually lose it’s ability to cling.  If this happens, it can sometimes be restored by rinsing the stamp in water and allowing it to air dry with the back facing up, but sometimes the cling surfaces get damaged beyond repair and lose their ability to cling completely, so take care of your stamps!


Next, you need to apply ink to your stamps.  I think the best way for most beginning stampers is to actually place the block down on your desk surface and tap the ink onto the stamp.  I’m going to steal a saying here from a lovely designer who brings much creativity and awesomeness to our store when she visits, Dyan Reaveley.  Dyan always says to apply your ink to your stamp using fairy steps instead of elephant steps.  In other words, don’t pound the ink into your stamp.  Doing so will put too much ink on your stamp, causing a fuzzy or smeared image.  It also puts ink on your block, ink on your hands, and extra ink on your paper where you don’t want it.  Plus, it’s mean.  Stop abusing those stamps!!  Gentle tapping until the entire surface is covered is all you need:


Inking the stamp

Inking the stamp


Now turn the block over and press onto your paper with steady, even pressure:


Stamp the Image

Stamp the Image


A lot of people are tempted to stand and lean on their stamps, or rock them back and forth.  Not only do you not need to do this, it’s another great way to mess up your image.  First, make sure the surface you’re stamping on is actually flat and solid.  If it has give, a lot of times little areas of the image don’t come out because of a flaw in the surface, not the stamp.  If you can’t get a good image, try placing the paper on a rubber stamping surface mat.  These will typically even out any problems you have with your stamping surface and provide much clearer images.


Pop Up Kittie face

Pop Up Kittie face


Voila!  We have a stamped image.  I stamped all the images I would need for my card, allowing my clear block to help me stamp images fairly close together to help save paper:


Stamping images close together

Stamping images close together


Next, I colored all my images.  I generally choose colors based on the papers I’m using, so I had those already picked out:


Colored images

Colored images


These papers are from Authentique’s Devoted Collection, a fun new collection we got in at the store that’s dedicated to our pet friends:


Authentique Devoted Collection

Authentique Devoted Collection


Next week I’ll show you some tips to use the accompanying die cut set and I’ll finish assembling the card, so be sure to log back in and check it out!


How Do I.... Basic Stamping