


Angel says: This is my creation using the Authentique “Lovely”
collection. I decided to challenge
myself to make a more masculine Valentines Day card. Not an easy task when most Valentines stuff
is so frilly!

I began by taking a standard size card base, and using the
largest Spellbinders Labels 8 die, cut the card base to make a shaped card.


Using the next-smallest Labels 8 die, I cut the mat for my
card out of this very cool Key cardstock paper.


I wanted to cut a heart shaped window in my mat, so turning
it over I traced the clear stamp onto the back side of my Key mat. Then, cut the window.


In order to create a black border around my mat I rough-cut
(not being careful or fussy to make it fit perfect) a piece of black cardstock
a little larger than my mat, and out of the center of this black piece, I
rough-cut a hole a little larger than my heart shaped window. Adhere the Key
mat to the black cardstock. Remember how we rough cut that black piece? Now
we’re going to go back and carefully cut around our mat leaving a 1/8” black
mat.
Now we’re ready to use that clear heart stamp we
traced earlier. Centering my Key mat onto my card base I taped it down with
some washi tape – no wiggling! I then stamp my heart inked up with Hero Arts
Royal Red. I carefully stamp the heart right into the center of my heart
window. Remove mat and washi tape from
card base. Your card base should at this point only have your red heart stamped
in the center.
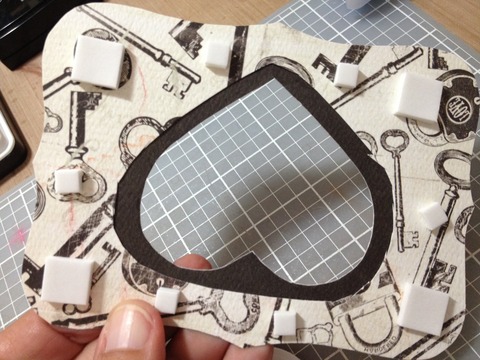
This photo is of the BACK of my Key mat. My black cardstock
I used is the reverse side of my Key cardstock, so at this point both the front
and back of my mat have Keys all over. Is that confusing enough for you? J Add foam adhesive to the back of the mat, and
adhere to the front of the card, centered over your red heart.

Now I want to work on my sentiment for the front of our
card. The Authentique “Lovely” collection has this sweet paper that looks like
a word-search puzzle with some Valentine-sey words circled in red. I chose the
word “sweetheart” as part of my sentiment and cut it from the paper, adding a
banner notch at the left end, and folding over the right end, about a half inch
from the end.

Mat sentiment on craft cardstock, cutting banner notch on
left end.

Adhere to from of card with Tim Holtz Tiny Attacher. I wrapped that folded end under my Key mat.

To add a bit of color and interest I watercolored the keys
with Distress Ink Faded Jeans and a water brush.
I finished off by accenting the word “sweetheart” with some
more Faded Jeans, and added the word sticker “my” in front of “sweetheart” with
a tiny paperclip.
1 comment:
VERY COOL.. and it's not just red or black like most valentine's day cards
Post a Comment